
코틀린(Kotlin)을 사용 파일 탐색기 만들기는
다양한 컨트롤을 사용해서 개발 가능하지만
조금 더 자유롭게 리스트를 구성할 수 있는
RecyclerView를 사용해서 구현해보겠습니다.
RecyclerView는 인스타그램, 유튜브 피드, 전화번호부
등과 같이 동일한 형태의 뷰의 데이터에 따라서 자유롭게
구성할 수 있는 컨트롤입니다.
기존에는 ListView를 많이 사용했지만 커스터마이징이
힘든 단점이 부각되면서 RecyclerView를 많이 사용합니다.
먼저 파일 탐색기에서 가장 기본으로 사용하는
파일, 폴더 단위를 관리할 수 있는 Fragment를 구성해보겠습니다.
app 트리에서 filelist 패키지를 생성 후
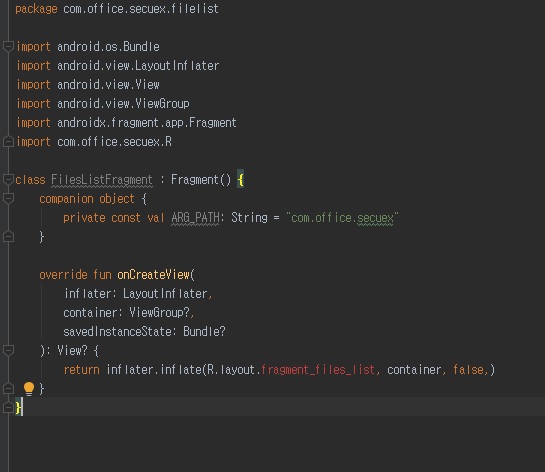
FilesListFragment 코틀린(Kotlin) Class를 생성합니다.
class FilesListFragment : Fragment() {
   companion object {
        private const val ARG_PATH: String = "com.office.secuex"
        fun build(block:Builder.()-> Unit) = Builder().apply(block).build()
    }

    override fun onCreateView(
        inflater: LayoutInflater,
        container: ViewGroup?,
        savedInstanceState: Bundle?
    ): View? {
        return inflater.inflate(R.layout.fragment_files_list, container, false)
    }
}
companion object를 선언해서 블록안에
전역 변수를 지정합니다.
onCreateView 실행 시 infalter을 사용해서 레이아웃을 출력합니다.

inflater에 사용하기 위한 fragment_files_list.xml을 생성합니다.
<?xml version="1.0" encoding="utf-8"?>
<androidx.constraintlayout.widget.ConstraintLayout  xmlns:android="http://schemas.android.com/apk/res/android"
    xmlns:app="http://schemas.android.com/apk/res-auto"
    android:layout_width="match_parent"
    android:layout_height="match_parent">

    <androidx.recyclerview.widget.RecyclerView
        android:id="@+id/filesRecyclerView"
        android:layout_width="match_parent"
        android:layout_height="match_parent"
        app:layout_behavior="com.google.android.material.appbar.AppBarLayout$ScroolingViewBehavior" />

    <LinearLayout
        android:id="@+id/emptyFolderLayout"
        android:layout_width="wrap_content"
        android:layout_height="wrap_content"
        android:orientation="vertical"
        android:gravity="center"
        app:layout_constraintBottom_toBottomOf="parent"
        app:layout_constraintLeft_toLeftOf="parent"
        app:layout_constraintRight_toRightOf="parent"
        app:layout_constraintTop_toTopOf="parent">

        <ImageView
            android:layout_width="200dp"
            android:layout_height="200dp"
            android:background="@drawable/background_circle"
            android:padding="40dp"
            android:src="@drawable/ic_folder_dark_24dp" />

        <TextView
            android:layout_width="wrap_content"
            android:layout_marginTop="16dp"
            android:layout_height="wrap_content"
            android:textSize="16sp"
            android:textStyle="bold"
            android:text="There is nothing here!"/>

        <TextView
            android:layout_width="wrap_content"
            android:layout_height="wrap_content"
            android:textSize="12sp"
            android:text="Empty Folder."/>

    </LinearLayout>

</androidx.constraintlayout.widget.ConstraintLayout >
RectclerView 속성인 app:layout_hehavior은
최신 버전 형태로 변경해야 합니다.
build.gradle app 항목에 아래 내용을 추가합니다.
implementation("androidx.recyclerview:recyclerview:1.2.1")
implementation("androidx.recyclerview:recyclerview-selection:1.1.0")
패키지를 추가하면 RecyClerView를 사용할 수 있습니다.

아이템 정보를 연결할 수 있는 빌더 클래스를
FileListFragment에 추가합니다.
    class Builder{
        var path : String = ""
        fun build(): FilesListFragment{
            val fragment = FilesListFragment()
            val args = Bundle()
            args.putString(ARG_PATH, path)
            fragment.arguments = args;
            return fragment
        }
    }
모든 변수에 연결할 수 있는 Builder 클래스는
입력받은 FilesListFragment 정보를 연결합니다.
이제 생성한 FilesListFragment를 MainActivity에
연결해야 합니다.

  override fun onCreate(savedInstanceState: Bundle?) {
        super.onCreate(savedInstanceState)
        setContentView(R.layout.activity_secu_explorer)

        if( savedInstanceState == null)
        {
            val filesListFragment = FilesListFragment.build {
                path = Environment.getExternalStorageDirectory().absolutePath
            }

            supportFragmentManager.beginTransaction()
                .add( R.id.container, filesListFragment)
                .addToBackStack( Environment.getExternalStorageDirectory().absolutePath)
                .commit()
        }
savedInstanceState가 없을 경우
filesListFragment를 생성해서 백그라운드로 실행시킵니다.
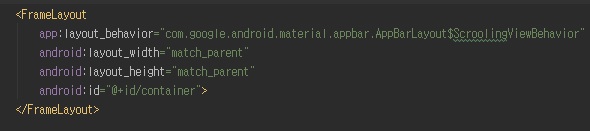
MainActivity 레이아웃에 FrameLayout를 생성합니다.
 <FrameLayout
        app:layout_behavior="com.google.android.material.appbar.AppBarLayout$ScroolingViewBehavior"
        android:layout_width="match_parent"
        android:layout_height="match_parent"
        android:id="@+id/container">
    </FrameLayout>
FrameLayout 속성 중 app:layout_behavior을
최신 버전 형태로 변경합니다.
FrameLayout를 사용해서 Activity가 실행되면
RecyclerView를 실행할 수 있는 기본 구조를 모두 확인했습니다.
이번에는 RecyclerView에 들어갈 파일, 폴더 정보를
정리해보겠습니다.
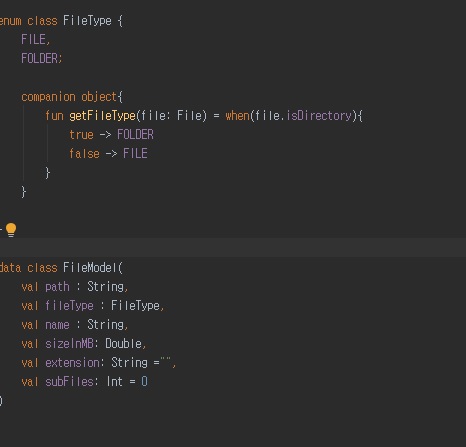
common 폴더를 생성하고 FileType.kt 파일을 생성합니다.
파일 타입, 파일 모델을 확인할 수 있는 두 개의
클래스를 정의합니다.
package com.office.secuex.common

import java.io.File

enum class FileType {
    FILE,
    FOLDER;

    companion object{
        fun getFileType(file: File) = when(file.isDirectory){
            true -> FOLDER
            false -> FILE
        }
    }

}

data class FileModel(
    val path : String,
    val fileType : FileType,
    val name : String,
    val sizeInMB: Double,
    val extension: String ="",
    val subFiles: Int = 0
)
FileModel은 경로, 타입, 이름
사이즈, 확장자로 구분됩니다.

파일 경로, 용량, 파일 모델을 구성하기 위한
함수를 utils 패키지를 생성해서 정의합니다.
package com.office.secuex.utils

import com.office.secuex.common.FileModel
import com.office.secuex.common.FileType
import java.io.File

fun getFilesFromPath( path : String, showHiddenFiles : Boolean = false, onlyFolders:Boolean = false)
        : List<File>{
    val file = File(path)
    return file.listFiles()
        .filter { showHiddenFiles || !it.name.startsWith(".")}
        .filter { !onlyFolders || it.isDirectory}
        .toList()
}

fun getFileModelsFromFiles(files: List<File>) : List<FileModel>{
    return files.map {
        FileModel(it.path, FileType.getFileType(it), it.name,
        convertFileSizeToMB(it.length()), it.extension, it.listFiles()?.size?:0)
    }
}

fun convertFileSizeToMB(sizeInBytes: Long) : Double{
    return ( sizeInBytes.toDouble()) / (1024 * 1024)
}
getFilesFromPath() 함수를 사용해서
파일 리스트를 확인할 수 있습니다.
FilesListFragment에서 사용하는
RectclerView에 연결하기 위한
item_recycler_file.xml 레이아웃을 생성합니다.
<?xml version="1.0" encoding="utf-8"?>
<androidx.constraintlayout.widget.ConstraintLayout  xmlns:android="http://schemas.android.com/apk/res/android"
    xmlns:app="http://schemas.android.com/apk/res-auto"
    xmlns:tools="http://schemas.android.com/tools"
    android:layout_width="match_parent"
    android:layout_height="wrap_content"
    android:layout_marginBottom="1dp"
    android:background="@color/colorPrimary"
    android:foreground="?selectableItemBackground"
    android:padding="16dp">

    <TextView
        android:id="@+id/nameTextView"
        android:layout_width="0dp"
        android:layout_height="wrap_content"
        android:textSize="20sp"
        app:layout_constraintLeft_toLeftOf="parent"
        app:layout_constraintRight_toRightOf="parent"
        app:layout_constraintTop_toTopOf="parent"
        tools:text="Pictuers" />

    <TextView
        android:id="@+id/folderTextView"
        android:layout_width="0dp"
        android:layout_height="wrap_content"
        android:text="(Folder)"
        android:textSize="12sp"
        android:visibility="gone"
        app:layout_constraintLeft_toLeftOf="@id/nameTextView"
        app:layout_constraintRight_toRightOf="@id/nameTextView"
        app:layout_constraintTop_toBottomOf="@id/nameTextView" />

    <TextView
        android:id="@+id/totalSizeTextView"
        android:layout_width="0dp"
        android:layout_height="wrap_content"
        android:text="4 MB"
        android:textSize="12sp"
        app:layout_constraintLeft_toLeftOf="parent"
        app:layout_constraintRight_toRightOf="parent"
        app:layout_constraintTop_toBottomOf="@id/folderTextView" />

</androidx.constraintlayout.widget.ConstraintLayout >
하단에 있는 참고 사이트와는 버전이 다르기 때문에
최신 버전은 ConstraintLayout를 사용해야 최신 버전에서
컴파일이 정상적으로 진행됩니다.
이제 RecyclerView에 정보를 연결할 수 있는
FilesRecyclerAdapter를 만들어 보겠습니다.
filelist 패키지 아래에 FilesRecyclerAdapter 클래스를 생성합니다.
package com.office.secuex.filelist

import android.view.LayoutInflater
import android.view.View
import android.view.ViewGroup
import com.office.secuex.R
import com.office.secuex.common.FileModel
import com.office.secuex.common.FileType
import androidx.recyclerview.widget.RecyclerView
import kotlinx.android.synthetic.main.item_recycler_file.view.*

class FilesRecyclerAdapter : RecyclerView.Adapter<FilesRecyclerAdapter.ViewHolder>() {

    var onItemClickListener: ((FileModel) -> Unit)? = null
    var onItemLongClickListener: ((FileModel) -> Unit)? = null

    var filesList = listOf<FileModel>()

    override fun onCreateViewHolder(parent: ViewGroup, viewType: Int): ViewHolder {
        val view = LayoutInflater.from(parent.context).inflate(R.layout.item_recycler_file, parent, false)
        return ViewHolder(view)
    }

    override fun getItemCount() = filesList.size

    override fun onBindViewHolder(holder: ViewHolder, position: Int) = holder.bindView(position)

    fun updateData(filesList: List<FileModel>) {
        this.filesList = filesList
        notifyDataSetChanged()
    }

    inner class ViewHolder(itemView: View) : RecyclerView.ViewHolder(itemView), View.OnClickListener, View.OnLongClickListener {
        init {
            itemView.setOnClickListener(this)
            itemView.setOnLongClickListener(this)
        }

        override fun onClick(v: View?) {
            onItemClickListener?.invoke(filesList[adapterPosition])
        }

        override fun onLongClick(v: View?): Boolean {
            onItemLongClickListener?.invoke(filesList[adapterPosition])
            return true
        }

        fun bindView(position: Int) {
            val fileModel = filesList[position]
            itemView.nameTextView.text = fileModel.name

            if (fileModel.fileType == FileType.FOLDER) {
                itemView.folderTextView.visibility = View.VISIBLE
                itemView.totalSizeTextView.visibility = View.GONE
                itemView.folderTextView.text = "(${fileModel.subFiles} files)"
            } else {
                itemView.folderTextView.visibility = View.GONE
                itemView.totalSizeTextView.visibility = View.VISIBLE
                itemView.totalSizeTextView.text = "${String.format("%.2f", fileModel.sizeInMB)} mb"
            }
        }
    }
}
RectclerView.adapter을 사용해서
파일 및 폴더 정보를 접근할 수 있습니다.
마지막으로 MainActivity에 연결된
FilesListFragment에 Adapter를 연결합니다.
package com.office.secuex.filelist

import android.view.LayoutInflater
import android.view.View
import android.view.ViewGroup
import com.office.secuex.R
import com.office.secuex.common.FileModel
import com.office.secuex.common.FileType
import androidx.recyclerview.widget.RecyclerView
import kotlinx.android.synthetic.main.item_recycler_file.view.*

class FilesRecyclerAdapter : RecyclerView.Adapter<FilesRecyclerAdapter.ViewHolder>() {

    var onItemClickListener: ((FileModel) -> Unit)? = null
    var onItemLongClickListener: ((FileModel) -> Unit)? = null

    var filesList = listOf<FileModel>()

    override fun onCreateViewHolder(parent: ViewGroup, viewType: Int): ViewHolder {
        val view = LayoutInflater.from(parent.context).inflate(R.layout.item_recycler_file, parent, false)
        return ViewHolder(view)
    }

    override fun getItemCount() = filesList.size

    override fun onBindViewHolder(holder: ViewHolder, position: Int) = holder.bindView(position)

    fun updateData(filesList: List<FileModel>) {
        this.filesList = filesList
        notifyDataSetChanged()
    }

    inner class ViewHolder(itemView: View) : RecyclerView.ViewHolder(itemView), View.OnClickListener, View.OnLongClickListener {
        init {
            itemView.setOnClickListener(this)
            itemView.setOnLongClickListener(this)
        }

        override fun onClick(v: View?) {
            onItemClickListener?.invoke(filesList[adapterPosition])
        }

        override fun onLongClick(v: View?): Boolean {
            onItemLongClickListener?.invoke(filesList[adapterPosition])
            return true
        }

        fun bindView(position: Int) {
            val fileModel = filesList[position]
            itemView.nameTextView.text = fileModel.name

            if (fileModel.fileType == FileType.FOLDER) {
                itemView.folderTextView.visibility = View.VISIBLE
                itemView.totalSizeTextView.visibility = View.GONE
                itemView.folderTextView.text = "(${fileModel.subFiles} files)"
            } else {
                itemView.folderTextView.visibility = View.GONE
                itemView.totalSizeTextView.visibility = View.VISIBLE
                itemView.totalSizeTextView.text = "${String.format("%.2f", fileModel.sizeInMB)} mb"
            }
        }
    }
}
컴파일을 진행하면 정상적으로 컴파일이 되면서
RecyclerView를 확인할 수 있어야 합니다.
그런데 Error가 발생하면서 컴파일이 안됩니다.
Error 내용은 파일에 접근을 할 수 없는 내용입니다.
스토리지 접근에 필요한 정보를 Manifest.xml에 추가했습니다.
 <uses-permission android:name="android.permission.READ_EXTERNAL_STORAGE" />
 <uses-permission android:name="android.permission.WRITE_EXTERNAL_STORAGE" />
권한을 추가해도 오류가 동일하게 발생합니다.
확인 결과 Application에 추가 권한 필요했습니다.

Application에 추가적으로 아래 속성을 추가합니다.
android:requestLegacyExternalStorage="true"자 그럼 다시 한번 컴파일을 해보겠습니다.

기본 스토리지 정보가 List에 출력되는 것을 확인할 수 있습니다.
코틀린(Kotlin)을 사용해서 리스트를 출력하기
위해서는 많은 코딩이 필요하지만
기본 내용을 이해하면 대부분 같은 패턴을 구성되기 때문에
한 번은 꼭 직접 코딩을 하면서 확인해주십시오.
저도 참고 내용을 확인하면서 진행했지만
버전 문제 따른 다양한 오류를 경험했습니다.
오늘은 코틀린(Kotlin)을 사용해서 파일 탐색기
기본 UI를 만들었습니다.
다음 시간에는 RecyclerView에서 이벤트
연동을 해보겠습니다.
감사합니다.
http://thetechnocafe.com/build-a-file-explorer-in-kotlin-part-2-reading-files-from-paths/
Build a File Explorer in Kotlin – Part 2 – Reading files from paths - TheTechnoCafe
In this tutorial you will read the list of files/folders on a given path and display them in a RecyclerView along with their size and meta data such as...
thetechnocafe.com
'IT 나라 > 코틀린(Kotlin)' 카테고리의 다른 글
| [ Kotlin ] assets를 이용한 XML 파서 (0) | 2021.09.13 |
|---|---|
| [ Kotlin ] 코틀린 파일 탐색기 만들기 3 (0) | 2021.09.08 |
| [ Kotlin ] 코틀린 파일 탐색기 만들기 1 (0) | 2021.08.19 |
| [ Kotlin ] 코틀린 안드로이드 카메라 원본 이미지 저장 방법 (0) | 2021.05.10 |
| [ Kotlin ] 코틀린 안드로이드 카메라 이벤트 이미지 뷰 연결하기 (0) | 2021.05.07 |