
코틀린(Kotlin)을 사용한 파일 탐색기 만들기 마지막 시간으로 오늘은 메뉴를 추가해서 신규 파일 및 폴더를 생성해보겠습니다.
메뉴를 등록하기 위해서 먼저 메뉴 리소스를 생성해야 합니다.

리소스 파일로 이동해서 menu 폴더 생성 후 main_menu.xml 파일을 생성합니다.

<?xml version="1.0" encoding="utf-8"?>
<menu xmlns:android="http://schemas.android.com/apk/res/android"
    xmlns:app="http://schemas.android.com/apk/res-auto"
    xmlns:tools="http://schemas.android.com/tools"
    tools:context=".main.SecuExplorer">

    <item
        android:id="@+id/menuCancel"
        android:icon="@drawable/ic_close_grey_24dp"
        android:title="Cancel"
        app:showAsAction="always" />

    <item
        android:id="@+id/menuPasteFile"
        android:icon="@drawable/ic_content_paste_grey_24dp"
        android:title="Paste"
        app:showAsAction="always" />

    <item
        android:id="@+id/subMenu"
        android:icon="@drawable/ic_folder_grey_24dp"
        android:title="Options"
        app:showAsAction="always"
        tools:ignore="AlwaysShowAction">
        <menu>
            <item
                android:id="@+id/menuNewFile"
                android:icon="@drawable/ic_insert_drive_file_grey_24dp"
                android:title="New File"
                app:showAsAction="never" />
            <item
                android:id="@+id/menuNewFolder"
                android:icon="@drawable/ic_create_new_folder_grey_24dp"
                android:title="New Folder"
                app:showAsAction="never" />
        </menu>
    </item>

</menu>
main_menu.xml 파일에 각 메뉴 아이콘 이미지 및 메뉴 정보를 입력합니다.
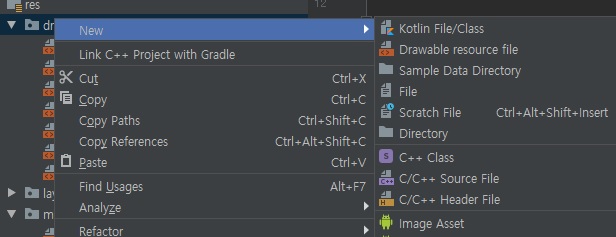
icon 메뉴는 xml 정보를 사용해서 vector로 구성되어 있습니다. 없을 경우 직접 xml을 생성해서 복사 붙여 넣기 해주시면 됩니다.
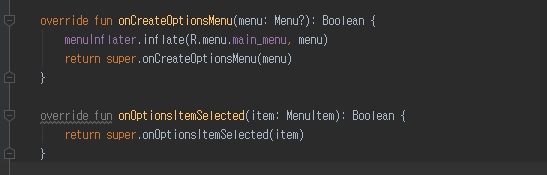
이제 메뉴를 연동하기 위해서 메인 Activity에 onCreateOptionMenu, onOptionsItemSelected 함수를 override 합니다.

앱을 실행하면 상단에 메뉴가 출력되는 것을 확인할 수 있습니다.
이제 메뉴를 클릭하면 실행할 수 있는 함수를 onOptonsItemSelected 함수에 연동해줍니다.
    override fun onCreateOptionsMenu(menu: Menu?): Boolean {
        menuInflater.inflate(R.menu.main_menu, menu)
        return super.onCreateOptionsMenu(menu)
    }

    override fun onOptionsItemSelected(item: MenuItem): Boolean {

        when( item?.itemId){
            R.id.menuNewFile -> createNewFileInCurrentDirectory()
            R.id.menuNewFolder-> createNewFolderInCurrentDirectory()
        }

        return super.onOptionsItemSelected(item)
    }

    private fun createNewFileInCurrentDirectory(){

    }

    private fun createNewFolderInCurrentDirectory(){

    }
각 메뉴 ID에 파일 및 폴더 생성 함수를 연결하면 이벤트가 함수를 호출하게 됩니다.
이제 파일을 생성하기 위한 Dialog를 구현하겠습니다. layout 아래에 dialog_enter_name.xml를 생성합니다.
<?xml version="1.0" encoding="utf-8"?>
<androidx.constraintlayout.widget.ConstraintLayout xmlns:android="http://schemas.android.com/apk/res/android"
xmlns:app="http://schemas.android.com/apk/res-auto"
android:layout_width="match_parent"
android:layout_height="wrap_content"
android:padding="16dp">
<TextView
android:id="@+id/enterNameTextView"
android:layout_width="wrap_content"
android:layout_height="wrap_content"
android:text="Enter a name"
android:textSize="20sp" />
<EditText
android:id="@+id/nameEditText"
android:layout_width="match_parent"
android:layout_height="wrap_content"
android:layout_marginTop="32dp"
app:layout_constraintLeft_toLeftOf="parent"
android:lines="1"
app:layout_constraintRight_toRightOf="parent"
app:layout_constraintTop_toBottomOf="@id/enterNameTextView"
android:inputType="text" />
<Button
android:id="@+id/createButton"
style="@style/PrimaryButton"
android:layout_width="wrap_content"
android:layout_height="wrap_content"
android:layout_marginTop="32dp"
android:text="Create"
app:layout_constraintRight_toRightOf="parent"
app:layout_constraintTop_toBottomOf="@id/nameEditText" />
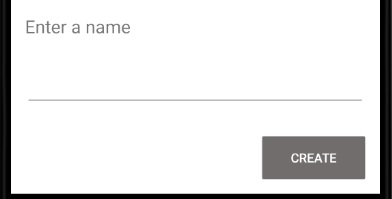
</androidx.constraintlayout.widget.ConstraintLayout >파일 생성에 필요한 Control를 constrainlayout에 배치합니다.
BottomSheetDialog를 호출하기 위해서 main Activity로 이동해서 createNewFileInCurrentDirectory 함수에 아래 내용을 입력합니다.
private fun createNewFileInCurrentDirectory(){
        val bottomSheetDialog = BottomSheetDialog(this)
        val view = LayoutInflater.from(this).inflate(R.layout.dialog_enter_name, null)
        view.createButton.setOnClickListener{
            val fileName = view.nameEditText.text.toString()
        }
        bottomSheetDialog.setContentView(view)
        bottomSheetDialog.show()
    }
앱을 실행해서 "New File" 메뉴를 클릭하면 하단에 File name을 입력할 수 있는 Dialog가 출력됩니다.
Dialog 출력 후 "CREATE" 버튼을 클릭하면 선택한 위치에 파일을 생성해야 합니다. 기존에 생성한 파일 관리 FileType.kt로 이동 후 createNewFile 함수를 입력합니다.
fun createNewFile(fileName : String, path: String, callback: (result:Boolean, message: String) -> Unit){
    val fileAlreadyExists = File(path).listFiles().map{ it.name}.contains(fileName)

    if( fileAlreadyExists){
        callback(false, "'{$fileName}' already exists")
    } else{
        val file = File(path, fileName)
        try{
            val result = file.createNewFile()
            if(result){
                callback(result, "File '${fileName}' created successfully.")
            } else{
                callback(result, "Unable to create file '${fileName}'.")
            }
        }catch( e: Exception){
            callback(false, "Unable to create file. Please try again.")
            e.printStackTrace()
        }
    }
}
createNewFile 함수는 callback 이벤트를 사용해서 파일 생성 여부를 판단 후 파일을 생성합니다.
main Activity로 이동해서 createNewFileInCurrentDirectory 함수로 이동해서 파일을 생성합니다.
  private fun createNewFileInCurrentDirectory(){
        val bottomSheetDialog = BottomSheetDialog(this)
        val view = LayoutInflater.from(this).inflate(R.layout.dialog_enter_name, null)
        view.createButton.setOnClickListener{
            val fileName = view.nameEditText.text.toString()

            if (fileName.isNotEmpty()) {
                createNewFile(fileName, backStackManager.top.path) { _, message ->
                    bottomSheetDialog.dismiss()
                }
            }
        }
        bottomSheetDialog.setContentView(view)
        bottomSheetDialog.show()
    }
파일 및 폴더 생성 정보를 확인하기 위해서 전체 메시지를 보낼 수 있는 BroadcastReceiver 클래스를 생성합니다.
class FileChangeBroadcastReceiver(val path: String, val onChange: () -> Unit) : BroadcastReceiver() {

    companion object {
        const val EXTRA_PATH = "com.office.secuex.fileservice.path"
    }

    override fun onReceive(context: Context?, intent: Intent?) {
        val filePath = intent?.extras?.getString(EXTRA_PATH)
        if (filePath.equals(path)) {
            onChange.invoke()
        }
    }
}
FileChangeBroadcastReceiver 함수를 사용하기 위해서 기존에 생성한 FilesListFragment로 이동합니다.
 override fun onCreate(savedInstanceState: Bundle?) {
        super.onCreate(savedInstanceState)

        val filePath = arguments?.getString(ARG_PATH)
        if (filePath == null) {
            Toast.makeText(context, "Path should not be null!", Toast.LENGTH_SHORT).show()
            return
        }
        PATH = filePath

        mFileChangeBroadcastReceiver = FileChangeBroadcastReceiver(PATH) {
            updateDate()
        }
    }

    override fun onResume() {
        super.onResume()
        context?.registerReceiver(mFileChangeBroadcastReceiver, IntentFilter(getString(R.string.file_change_broadcast)))
    }

    override fun onPause() {
        super.onPause()
        context?.unregisterReceiver(mFileChangeBroadcastReceiver)
    }
앱 시퀀스에 따라서 이벤트를 확인할 수 있는 로직을 추가해서 파일 및 폴더를 생성할 경우 갱신되도록 구현합니다.
private fun createNewFileInCurrentDirectory() {
        val bottomSheetDialog = BottomSheetDialog(this)
        val view = LayoutInflater.from(this).inflate(R.layout.dialog_enter_name, null)
        view.createButton.setOnClickListener {
            val fileName = view.nameEditText.text.toString()
            if (fileName.isNotEmpty()) {
                createNewFile(fileName, backStackManager.top.path) { _, message ->
                    bottomSheetDialog.dismiss()
                    Toast.makeText(this, message, Toast.LENGTH_LONG).show()
                    updateContentOfCurrentFragment()
                }
            }
        }
        bottomSheetDialog.setContentView(view)
        bottomSheetDialog.show()
    }

    private fun createNewFolderInCurrentDirectory(){
        val bottomSheetDialog = BottomSheetDialog(this)
        val view = LayoutInflater.from(this).inflate(R.layout.dialog_enter_name, null)
        view.createButton.setOnClickListener {
            val fileName = view.nameEditText.text.toString()
            if (fileName.isNotEmpty()) {
                createNewFolder(fileName, backStackManager.top.path) { _, message ->
                    bottomSheetDialog.dismiss()
                    //coordinatorLayout.createShortSnackbar(message)
                    Toast.makeText(this, message, Toast.LENGTH_LONG).show()
                    updateContentOfCurrentFragment()
                }
            }
        }
        bottomSheetDialog.setContentView(view)
        bottomSheetDialog.show()
    }


    private fun updateContentOfCurrentFragment() {
        val broadcastIntent = Intent()
        broadcastIntent.action = applicationContext.getString(R.string.file_change_broadcast)
        broadcastIntent.putExtra(FileChangeBroadcastReceiver.EXTRA_PATH, backStackManager.top.path)
        sendBroadcast(broadcastIntent)
    }
main Activity 클래스에 createNewFile, createNewFolder 함수에 각 파일을 생성할 수 있는 함수를 연동합니다.
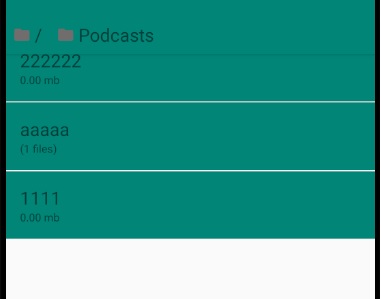
함수 연동 후 메뉴를 클릭해서 이름을 입력하면 파일 및 폴더가 생성되면서 메시지가 출력됩니다.
파일 삭제
파일 탐색기에서 파일을 삭제하기 위해서는 간단하게 길게 클릭하는 이벤트를 사용해서 Dialog를 출력 후 처리하게 로직을 추가합니다.
파일 삭제 정보를 입력할 수 있는 FileOptionDialog 클래스를 생성합니다.
class FileOptionsDialog : BottomSheetDialogFragment() {
var onDeleteClickListener: (() -> Unit)? = null
var onCopyClickListener: (() -> Unit)? = null
companion object {
fun build(block: Builder.() -> Unit): FileOptionsDialog = Builder().apply(block).build()
}
class Builder {
var path: String? = null
fun build(): FileOptionsDialog {
val fragment = FileOptionsDialog()
val args = Bundle()
fragment.arguments = args
return fragment
}
}
override fun onCreateView(inflater: LayoutInflater, container: ViewGroup?, savedInstanceState: Bundle?): View? {
return inflater.inflate(R.layout.dialog_file_options, container, false)
}
override fun onViewCreated(view: View, savedInstanceState: Bundle?) {
super.onViewCreated(view, savedInstanceState)
initViews()
}
private fun initViews() {
deleteTextView.setOnClickListener {
onDeleteClickListener?.invoke()
dismiss()
}
copyTextView.setOnClickListener {
onCopyClickListener?.invoke()
dismiss()
}
}
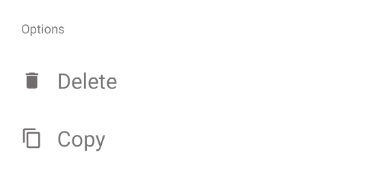
}OptionDialog 클래스에 컨트롤러를 연결하기 위해서 layout dialog_file_options.xml을 추가합니다.
<?xml version="1.0" encoding="utf-8"?>
<androidx.constraintlayout.widget.ConstraintLayout xmlns:android="http://schemas.android.com/apk/res/android"
    xmlns:app="http://schemas.android.com/apk/res-auto"
    android:layout_width="match_parent"
    android:layout_height="wrap_content"
    android:background="@android:color/white"
    android:paddingBottom="24dp">

    <TextView
        android:id="@+id/fileOptionsTextView"
        android:layout_width="0dp"
        android:layout_height="wrap_content"
        android:layout_margin="24dp"
        android:text="Options"
        app:layout_constraintLeft_toLeftOf="parent"
        app:layout_constraintRight_toRightOf="parent"
        app:layout_constraintTop_toTopOf="parent" />

    <TextView
        android:id="@+id/deleteTextView"
        style="@style/FileDialogOption"
        android:layout_width="0dp"
        android:layout_height="wrap_content"
        android:layout_marginTop="16dp"
        android:drawableLeft="@drawable/ic_delete_grey_24dp"
        android:drawableStart="@drawable/ic_delete_grey_24dp"
        android:text="Delete"
        app:layout_constraintLeft_toLeftOf="parent"
        app:layout_constraintRight_toRightOf="parent"
        app:layout_constraintTop_toBottomOf="@id/fileOptionsTextView" />

    <TextView
        android:id="@+id/copyTextView"
        style="@style/FileDialogOption"
        android:layout_width="0dp"
        android:layout_height="wrap_content"
        android:drawableLeft="@drawable/ic_content_copy_grey_24dp"
        android:drawableStart="@drawable/ic_content_copy_grey_24dp"
        android:text="Copy"
        app:layout_constraintLeft_toLeftOf="parent"
        app:layout_constraintRight_toRightOf="parent"
        app:layout_constraintTop_toBottomOf="@id/deleteTextView" />

</androidx.constraintlayout.widget.ConstraintLayout>
main Activity로 이동 후 OnLongClick 함수에 optionDialog 클래스를 연동합니다.
 companion object {
        private const val OPTIONS_DIALOG_TAG: String = "com.com.office.secuex.main.options_dialog"
    }
override fun onLongClick(fileModel: FileModel) {
        val optionsDialog = FileOptionsDialog.build {}

        optionsDialog.onDeleteClickListener = {
            FileUtilsDeleteFile(fileModel.path)
            updateContentOfCurrentFragment()
        }

        optionsDialog.show(supportFragmentManager, OPTIONS_DIALOG_TAG)
    }
마지막으로 파일 삭제 함수를 FileType.kt에 입력합니다.
fun deleteFile(path: String) {
    val file = File(path)
    if (file.isDirectory) {
        file.deleteRecursively()
    } else {
        file.delete()
    }
}
deleteFile 함수는 이름 변경을 사용해서 직접 import 합니다.
import com.office.secuex.common.deleteFile as FileUtilsDeleteFile파일 탐색기에서 파일을 선택하고 길게 클릭하면 하단에 optionDilaog가 출력됩니다.
"Delete" 메뉴를 클릭하면 폴더 및 파일이 삭제됩니다.
파일 탐색기는 다양한 기능이 포함되어 있는 앱으로 처음 코틀린(Kotlin) 안드로이드를 공부하기 매우 좋은 앱입니다.
파일 탐색기 기본 소스를 사용해서 다양하게 변형된 기능 앱을 지금 부터 개발해보세요.
감사합니다.
Build a File Explorer in Kotlin - Part 5 - Creating/Deleting files and folders - TheTechnoCafe
Till now you have only read files. In this part of Kotlin File Explorer Series you will learn how to create and delete file and folders.
thetechnocafe.com