반응형

Docker는 images를 생성해서 container로 실행합니다. 생성된 images는 run 명령어를 사용해서 container로 실행 후 동작하게 됩니다.

container 실행 시 STATUS가 UP 상태이면 내부 접속이 가능합니다. 오늘은 Docker container 접속 방법을 알아보겠습니다.

먼저 실행 중인 container 내용을 확인하기 위해서 docker ps -a 명령어를 사용해서 실행 중인 container 리스트를 확인합니다.

Docker container 내부 접속하기 위해서는 두 가지 방법을 접속이 가능합니다.

docker exec -it [CONTAINER ID] /bin/bash 명령어를 사용합니다.

tomcat container에 접속하기 위해서 docker exec -it bd9fc5e8cd11 /bin/bash를 입력합니다.


bash는 리눅스 쉘 명령어로 실행 후 tomcat container에 접속된 것을 확인할 수 있습니다.

ls 명령어를 사용하면 container 내부 폴더 및 파일을 확인할 수 있습니다.

컨테이너(container)에서 나오기 위해서는 "exit" 또는 Ctrl + D 키를 사용하면 됩니다.

exit를 사용하면 root로 이동하를 것을 확인할 수 있습니다.

두번째 접속 방법은 sh를 사용해서 쉘을 실행시키는 방법입니다.

기존 명령어와 동일하며 마지막에 sh를 입력하면 됩니다.

docker exec -it bd9fc5e8cd11 sh를 입력하면 컨테이너(container)에 접속됩니다.

컨테이너(container)에 접속하면 다양한 명령어를 사용해서 파일 복사 및 설치가 가능합니다.

이상으로 Docker 컨테이너(container) 접속 방법을 마치겠습니다.

감사합니다.

반응형
반응형

오늘은 Docker CE를 GentOS 7에 설치하는 방법을 알아보겠습니다.

먼저 su root 권한으로 변경합니다.

sudo yum update

명령어를 사용해서 시스템 패키지를 업데이트합니다.

패티지 업데이트를 진행하면 중간에 설치 여부를 확인합니다. 'Y'를 선택해주세요.

패키지 업데이트가 완료되면 필요한 종속성을 설치해야 합니다.

sudo yum install yum-utils device-mapper-persistent-data lvm2

명령어를 입력해주세요.

필요한 파일이 재 설치됩니다.

이번에는 아래 명령어를 사용해서 Docker 안정적 리포지토리를 시스템에 추가합니다.

sudo yum-config-manager --add-repo https://download.docker.com/linux/centos/docker-ce.repo 

이제 Docker-ce를 설치해야 합니다. 아래 명령어를 입력해주세요.

sudo yum inhstall docker-ce


명령어 입력 후 Docker 패키지 정보를 확인할 수 있습니다.

설치 용량을 확인하고 'Y'를 입력하면 docker-ce가 설치됩니다.

설치된 Docker 데몬을 자동으로 시작하기 위해서 부팅 시 실행을 등록합니다.

sudo systemctl start docker

sudo systemctl enable socker

이제 시스템 재 부팅 후에도 docker 데몬이 자동으로 실행됩니다.

정상적으로 Docker 데몬이 실행 중인지 확인하기 위해서 아래 명령어를 입력합니다.

sudo systemctl status docker

Active 항목에 "running" 상태를 확인할 수 있습니다.

마지막으로 설치된 Docker 버전을 확인하기 위해서 아래 명령어를 입력합니다.

docker -v

Docker 20.10.10 버전을 확인할 수 있습니다.

오늘은 GentOS 7에서 간단하게 Docker를 설치하는 방법을 확인했습니다.

감사합니다.

반응형
반응형

CentOS에서 sudo 명령어를 사용할 경우 오류가 발생하면서 실행이 안 되는 문제가 있습니다. 오류 내용은 아래 내용입니다.

(사용자 이름) is not in the sudoers file. this incident will be reported

내용을 확인해보면 sudo에 사용자 root 권한이 없어서 발생하는 문제입니다. 그래서 사용자에 모든 권한을 부여하는 방법을 알아보겠습니다.

sudo yum 명령어를 실행하면 사용자 이름으로 사용할 수 없다고 합니다.

su 명령어를 사용해서 root 권한으로 접근합니다. 명령어 실행 시 password를 입력해주세요.

root 권한을 입력하기 위해서 vi /etx/sudoers 명령어를 입력해서 vi로 파일을 수정해야 합니다.

sudoers 파일이 오픈되면 방향키를 사용해서 아래쪽으로 내려갑니다.

중간에 root ALL=(ALL) ALL 라인을 확인할 수 있습니다.

아래쪽에 사용자 이름에 동일한 권한을 부여합니다.

"사용자 이름 ALL=(ALL:ALL) ALL"을 입력 후 vi를 저장하면 됩니다.

vi 저장 방법은 ESC를 클릭하고 ':' 키를 눌러주면 아래쪽에 명령어 입력이 가능합니다. 명령어 입력에서 'w' 또는 'wq'를 입력해서 저장 후 종료합니다.

저장 기능이 잘 안될 경우는 사용자 계정이 아닌 su root 계정으로 실행하면 정상적으로 sudo 명령어를 사용할 수 있습니다.

감사합니다.


반응형
반응형

안드로이드는 다양한 레이아웃 파일을 생성해서 위젯을 자유롭게 변경할 수 있습니다.

오늘은 코틀린(Kotlin) 안드로이드에서 상태를 확인할 수 있는 프로그래스 바를 커스텀해서 원형으로 만들어 보겠습니다.

Custom Circular Progress bar를 만들기위해서 두 개의 레이아웃을 사용해보겠습니다.

원형 상태바(Circular Progress Bar)는 백그라운드를 사용해서 상태바(Progress Bar) 배경을 구현하고, 레이아웃을 로드해서 상태바(Progress Bar)를 디자인해보겠습니다.

먼저 drawable 하위 폴더에 progress_background.xml을 생성합니다.

생성된 xml에 shape를 사용해서 rectangle을 타원형으로 구성합니다.

bottomRightRadius, topRightRadius, topLeftRadius, BottomLeftRadius 속성을 사용해서 각 모서리를 타원형으로 구성합니다.

<?xml version="1.0" encoding="utf-8"?>
<shape
    xmlns:android="http://schemas.android.com/apk/res/android"
    android:shape="rectangle">
    <solid android:color="#FF0089"/>
    <size
        android:width="5dp"
        android:height="10dp"/>
    <corners
        android:bottomRightRadius="40dp"
        android:topRightRadius="40dp"
        android:topLeftRadius="40dp"
        android:bottomLeftRadius="40dp"/>
</shape>

shape를 사용해면 다양한 모형을 그릴 수 있습니다.

이번에는 원형 상태바(Circular Progress Bar)를 만들기 위해서 상태바(Progress Bar) 레이아웃을 만들어야 합니다.

drawable 폴더 아래에 main_progressbar.xml을 생성합니다.

<?xml version="1.0" encoding="utf-8"?>
<rotate
    xmlns:android="http://schemas.android.com/apk/res/android"
    android:fromDegrees="270"
    android:toDegrees="270" >

    <shape
        android:innerRadiusRatio="2.5"
        android:shape="ring"
        android:thickness="5dp"
        android:useLevel="true">

        <gradient
            android:angle="0"
            android:endColor="@color/colorPrimary"
            android:centerColor="@color/colorPrimary"
            android:startColor="@color/colorPrimary"
            android:type="sweep"
            android:useLevel="false"/>

    </shape>

</rotate>

rotate를 사용해서 원형 상태바(Circular Progress Bar)를 디자인합니다.

shap 속성에서는 상태바(Progress Bar) 크기를 설정할 수 있습니다. gradinent는 상태바(Progress Bar) 내부 색상을 설정할 수 있습니다.

마지막으로 drawable에 생성된 progress_background.xml, main_progressbar.xml을 사용해서 Custom 원형 상태바(Circular Progress Bar)를 구성해보겠습니다.

activity_main.xml에 ProgressBar, Button을 등록합니다.

<Button
        android:id="@+id/btn_progress"
        android:layout_width="match_parent"
        android:layout_height="wrap_content"
        android:text="progress"/>
    
   <ProgressBar
       android:id="@+id/progressbar"
       android:layout_width="match_parent"
       android:layout_height="400dp"
       android:background="@drawable/progress_background2"
       android:progressDrawable="@drawable/main_ptogressbar"
       android:indeterminateOnly="false"
       android:max="120"
       android:progress="0"
       app:layout_constraintBottom_toBottomOf="parent"
       app:layout_constraintEnd_toEndOf="parent"
       app:layout_constraintStart_toStartOf="parent"
       app:layout_constraintTop_toTopOf="parent" />

Button은 원형 상태바(Circular Progress Bar)를 실행하기 위한 이벤트 버튼입니다.

상태바(ProgressBar) 속성 중에서 background에 progress_background.xml을 입력합니다.

progressDrawable 속성에는 원형 이미지 main_progressbar을 입력합니다.

이제 마지막으로 이벤트를 사용해서 원형 상태바(Circular Progress Bar)를 실행해야 합니다.

MainActivity로 이동해서 아래 코드를 입력합니다.

override fun onCreate(savedInstanceState: Bundle?) {
        super.onCreate(savedInstanceState)
        setContentView(R.layout.activity_main)

        val buttonStart = findViewById<Button>(R.id.btn_progress)
        val CProgressBar = findViewById<ProgressBar>(R.id.progressbar)
        var iPos : Int = 10
        var iMaxValue : Int = 0

        iMaxValue = CProgressBar.max


        buttonStart.setOnClickListener{
            if( iMaxValue <= iPos)
            {
                CProgressBar.visibility =View.GONE
                Toast.makeText(this,"완료됨",Toast.LENGTH_SHORT).show()
                iPos = 0
                CProgressBar.setProgress(iPos)
            }
            else
            {
                if( 0 == iPos )
                {
                    CProgressBar.visibility = View.VISIBLE
                }
                iPos += 10
                CProgressBar.setProgress(iPos)
            }
        }

    }

findViewById 함수를 사용해서 버튼, 상태바를 선언합니다.

원형 상태바(Circular Progress Bar)는 setProgress 함수를 사용해서 이동할 수 있습니다.

상태바 함수 max를 사용해서 최댓값을 확인하고 상태바 증가 값이 최댓값과 같다면 초기화하는 구조입니다.

코트린 안드로이드 실행 후 상단 버튼을 클릭하면 원형 상태바(Circular Progress Bar)가 회전하면서 변경됩니다.

백그라운드(background)는 shape를 사용해서 라운드형 사각형을 확인할 수 있습니다.

상태바(ProgressBar)는 다양한 기능으로 사용되면서 자유롭게 커스텀할 수 있어 안드로이드 앱을 더욱더 효과적으로 표현할 수 있는 좋은 기술입니다.

감사합니다.

반응형
반응형


코틀린(Kotlin)을 사용한 파일 탐색기 만들기 마지막 시간으로 오늘은 메뉴를 추가해서 신규 파일 및 폴더를 생성해보겠습니다.

메뉴를 등록하기 위해서 먼저 메뉴 리소스를 생성해야 합니다.

리소스 파일로 이동해서 menu 폴더 생성 후 main_menu.xml 파일을 생성합니다.

<?xml version="1.0" encoding="utf-8"?>
<menu xmlns:android="http://schemas.android.com/apk/res/android"
    xmlns:app="http://schemas.android.com/apk/res-auto"
    xmlns:tools="http://schemas.android.com/tools"
    tools:context=".main.SecuExplorer">

    <item
        android:id="@+id/menuCancel"
        android:icon="@drawable/ic_close_grey_24dp"
        android:title="Cancel"
        app:showAsAction="always" />

    <item
        android:id="@+id/menuPasteFile"
        android:icon="@drawable/ic_content_paste_grey_24dp"
        android:title="Paste"
        app:showAsAction="always" />

    <item
        android:id="@+id/subMenu"
        android:icon="@drawable/ic_folder_grey_24dp"
        android:title="Options"
        app:showAsAction="always"
        tools:ignore="AlwaysShowAction">
        <menu>
            <item
                android:id="@+id/menuNewFile"
                android:icon="@drawable/ic_insert_drive_file_grey_24dp"
                android:title="New File"
                app:showAsAction="never" />
            <item
                android:id="@+id/menuNewFolder"
                android:icon="@drawable/ic_create_new_folder_grey_24dp"
                android:title="New Folder"
                app:showAsAction="never" />
        </menu>
    </item>

</menu>

main_menu.xml 파일에 각 메뉴 아이콘 이미지 및 메뉴 정보를 입력합니다.

icon 메뉴는 xml 정보를 사용해서 vector로 구성되어 있습니다. 없을 경우 직접 xml을 생성해서 복사 붙여 넣기 해주시면 됩니다.

이제 메뉴를 연동하기 위해서 메인 Activity에 onCreateOptionMenu, onOptionsItemSelected 함수를 override 합니다.

앱을 실행하면 상단에 메뉴가 출력되는 것을 확인할 수 있습니다. 

이제 메뉴를 클릭하면 실행할 수 있는 함수를 onOptonsItemSelected 함수에 연동해줍니다.

    override fun onCreateOptionsMenu(menu: Menu?): Boolean {
        menuInflater.inflate(R.menu.main_menu, menu)
        return super.onCreateOptionsMenu(menu)
    }

    override fun onOptionsItemSelected(item: MenuItem): Boolean {

        when( item?.itemId){
            R.id.menuNewFile -> createNewFileInCurrentDirectory()
            R.id.menuNewFolder-> createNewFolderInCurrentDirectory()
        }

        return super.onOptionsItemSelected(item)
    }

    private fun createNewFileInCurrentDirectory(){

    }

    private fun createNewFolderInCurrentDirectory(){

    }

각 메뉴 ID에 파일 및 폴더 생성 함수를 연결하면 이벤트가 함수를 호출하게 됩니다.

이제 파일을 생성하기 위한 Dialog를 구현하겠습니다. layout 아래에 dialog_enter_name.xml를 생성합니다.

<?xml version="1.0" encoding="utf-8"?>
<androidx.constraintlayout.widget.ConstraintLayout  xmlns:android="http://schemas.android.com/apk/res/android"
    xmlns:app="http://schemas.android.com/apk/res-auto"
    android:layout_width="match_parent"
    android:layout_height="wrap_content"
    android:padding="16dp">

    <TextView
        android:id="@+id/enterNameTextView"
        android:layout_width="wrap_content"
        android:layout_height="wrap_content"
        android:text="Enter a name"
        android:textSize="20sp" />

    <EditText
        android:id="@+id/nameEditText"
        android:layout_width="match_parent"
        android:layout_height="wrap_content"
        android:layout_marginTop="32dp"
        app:layout_constraintLeft_toLeftOf="parent"
        android:lines="1"
        app:layout_constraintRight_toRightOf="parent"
        app:layout_constraintTop_toBottomOf="@id/enterNameTextView"
        android:inputType="text" />

    <Button
        android:id="@+id/createButton"
        style="@style/PrimaryButton"
        android:layout_width="wrap_content"
        android:layout_height="wrap_content"
        android:layout_marginTop="32dp"
        android:text="Create"
        app:layout_constraintRight_toRightOf="parent"
        app:layout_constraintTop_toBottomOf="@id/nameEditText" />

</androidx.constraintlayout.widget.ConstraintLayout >

파일 생성에 필요한 Control를 constrainlayout에 배치합니다. 

BottomSheetDialog를 호출하기 위해서 main Activity로 이동해서 createNewFileInCurrentDirectory 함수에 아래 내용을 입력합니다.

private fun createNewFileInCurrentDirectory(){
        val bottomSheetDialog = BottomSheetDialog(this)
        val view = LayoutInflater.from(this).inflate(R.layout.dialog_enter_name, null)
        view.createButton.setOnClickListener{
            val fileName = view.nameEditText.text.toString()
        }
        bottomSheetDialog.setContentView(view)
        bottomSheetDialog.show()
    }

앱을 실행해서 "New File" 메뉴를 클릭하면 하단에 File name을 입력할 수 있는 Dialog가 출력됩니다.

Dialog 출력 후 "CREATE" 버튼을 클릭하면 선택한 위치에 파일을 생성해야 합니다. 기존에 생성한 파일 관리 FileType.kt로 이동 후 createNewFile 함수를 입력합니다.

fun createNewFile(fileName : String, path: String, callback: (result:Boolean, message: String) -> Unit){
    val fileAlreadyExists = File(path).listFiles().map{ it.name}.contains(fileName)

    if( fileAlreadyExists){
        callback(false, "'{$fileName}' already exists")
    } else{
        val file = File(path, fileName)
        try{
            val result = file.createNewFile()
            if(result){
                callback(result, "File '${fileName}' created successfully.")
            } else{
                callback(result, "Unable to create file '${fileName}'.")
            }
        }catch( e: Exception){
            callback(false, "Unable to create file. Please try again.")
            e.printStackTrace()
        }
    }
}

createNewFile 함수는 callback 이벤트를 사용해서 파일 생성 여부를 판단 후 파일을 생성합니다.

main Activity로 이동해서 createNewFileInCurrentDirectory 함수로 이동해서 파일을 생성합니다.

  private fun createNewFileInCurrentDirectory(){
        val bottomSheetDialog = BottomSheetDialog(this)
        val view = LayoutInflater.from(this).inflate(R.layout.dialog_enter_name, null)
        view.createButton.setOnClickListener{
            val fileName = view.nameEditText.text.toString()

            if (fileName.isNotEmpty()) {
                createNewFile(fileName, backStackManager.top.path) { _, message ->
                    bottomSheetDialog.dismiss()
                }
            }
        }
        bottomSheetDialog.setContentView(view)
        bottomSheetDialog.show()
    }

파일 및 폴더 생성 정보를 확인하기 위해서 전체 메시지를 보낼 수 있는 BroadcastReceiver 클래스를 생성합니다.

class FileChangeBroadcastReceiver(val path: String, val onChange: () -> Unit) : BroadcastReceiver() {

    companion object {
        const val EXTRA_PATH = "com.office.secuex.fileservice.path"
    }

    override fun onReceive(context: Context?, intent: Intent?) {
        val filePath = intent?.extras?.getString(EXTRA_PATH)
        if (filePath.equals(path)) {
            onChange.invoke()
        }
    }
}

FileChangeBroadcastReceiver 함수를 사용하기 위해서 기존에 생성한 FilesListFragment로 이동합니다.

 override fun onCreate(savedInstanceState: Bundle?) {
        super.onCreate(savedInstanceState)

        val filePath = arguments?.getString(ARG_PATH)
        if (filePath == null) {
            Toast.makeText(context, "Path should not be null!", Toast.LENGTH_SHORT).show()
            return
        }
        PATH = filePath

        mFileChangeBroadcastReceiver = FileChangeBroadcastReceiver(PATH) {
            updateDate()
        }
    }

    override fun onResume() {
        super.onResume()
        context?.registerReceiver(mFileChangeBroadcastReceiver, IntentFilter(getString(R.string.file_change_broadcast)))
    }

    override fun onPause() {
        super.onPause()
        context?.unregisterReceiver(mFileChangeBroadcastReceiver)
    }

앱 시퀀스에 따라서 이벤트를 확인할 수 있는 로직을 추가해서 파일 및 폴더를 생성할 경우 갱신되도록 구현합니다.

private fun createNewFileInCurrentDirectory() {
        val bottomSheetDialog = BottomSheetDialog(this)
        val view = LayoutInflater.from(this).inflate(R.layout.dialog_enter_name, null)
        view.createButton.setOnClickListener {
            val fileName = view.nameEditText.text.toString()
            if (fileName.isNotEmpty()) {
                createNewFile(fileName, backStackManager.top.path) { _, message ->
                    bottomSheetDialog.dismiss()
                    Toast.makeText(this, message, Toast.LENGTH_LONG).show()
                    updateContentOfCurrentFragment()
                }
            }
        }
        bottomSheetDialog.setContentView(view)
        bottomSheetDialog.show()
    }

    private fun createNewFolderInCurrentDirectory(){
        val bottomSheetDialog = BottomSheetDialog(this)
        val view = LayoutInflater.from(this).inflate(R.layout.dialog_enter_name, null)
        view.createButton.setOnClickListener {
            val fileName = view.nameEditText.text.toString()
            if (fileName.isNotEmpty()) {
                createNewFolder(fileName, backStackManager.top.path) { _, message ->
                    bottomSheetDialog.dismiss()
                    //coordinatorLayout.createShortSnackbar(message)
                    Toast.makeText(this, message, Toast.LENGTH_LONG).show()
                    updateContentOfCurrentFragment()
                }
            }
        }
        bottomSheetDialog.setContentView(view)
        bottomSheetDialog.show()
    }


    private fun updateContentOfCurrentFragment() {
        val broadcastIntent = Intent()
        broadcastIntent.action = applicationContext.getString(R.string.file_change_broadcast)
        broadcastIntent.putExtra(FileChangeBroadcastReceiver.EXTRA_PATH, backStackManager.top.path)
        sendBroadcast(broadcastIntent)
    }

main Activity 클래스에 createNewFile, createNewFolder 함수에 각 파일을 생성할 수 있는 함수를 연동합니다.

함수 연동 후 메뉴를 클릭해서 이름을 입력하면 파일 및 폴더가 생성되면서 메시지가 출력됩니다.

파일 삭제

파일 탐색기에서 파일을 삭제하기 위해서는 간단하게 길게 클릭하는 이벤트를 사용해서 Dialog를 출력 후 처리하게 로직을 추가합니다.

파일 삭제 정보를 입력할 수 있는 FileOptionDialog 클래스를 생성합니다.

class FileOptionsDialog : BottomSheetDialogFragment() {

    var onDeleteClickListener: (() -> Unit)? = null
    var onCopyClickListener: (() -> Unit)? = null

    companion object {
        fun build(block: Builder.() -> Unit): FileOptionsDialog = Builder().apply(block).build()
    }

    class Builder {
        var path: String? = null

        fun build(): FileOptionsDialog {
            val fragment = FileOptionsDialog()
            val args = Bundle()
            fragment.arguments = args
            return fragment
        }
    }

    override fun onCreateView(inflater: LayoutInflater, container: ViewGroup?, savedInstanceState: Bundle?): View? {
        return inflater.inflate(R.layout.dialog_file_options, container, false)
    }

    override fun onViewCreated(view: View, savedInstanceState: Bundle?) {
        super.onViewCreated(view, savedInstanceState)
        initViews()
    }

    private fun initViews() {
        deleteTextView.setOnClickListener {
            onDeleteClickListener?.invoke()
            dismiss()
        }

        copyTextView.setOnClickListener {
            onCopyClickListener?.invoke()
            dismiss()
        }
    }
}

OptionDialog 클래스에 컨트롤러를 연결하기 위해서 layout dialog_file_options.xml을 추가합니다.

<?xml version="1.0" encoding="utf-8"?>
<androidx.constraintlayout.widget.ConstraintLayout xmlns:android="http://schemas.android.com/apk/res/android"
    xmlns:app="http://schemas.android.com/apk/res-auto"
    android:layout_width="match_parent"
    android:layout_height="wrap_content"
    android:background="@android:color/white"
    android:paddingBottom="24dp">

    <TextView
        android:id="@+id/fileOptionsTextView"
        android:layout_width="0dp"
        android:layout_height="wrap_content"
        android:layout_margin="24dp"
        android:text="Options"
        app:layout_constraintLeft_toLeftOf="parent"
        app:layout_constraintRight_toRightOf="parent"
        app:layout_constraintTop_toTopOf="parent" />

    <TextView
        android:id="@+id/deleteTextView"
        style="@style/FileDialogOption"
        android:layout_width="0dp"
        android:layout_height="wrap_content"
        android:layout_marginTop="16dp"
        android:drawableLeft="@drawable/ic_delete_grey_24dp"
        android:drawableStart="@drawable/ic_delete_grey_24dp"
        android:text="Delete"
        app:layout_constraintLeft_toLeftOf="parent"
        app:layout_constraintRight_toRightOf="parent"
        app:layout_constraintTop_toBottomOf="@id/fileOptionsTextView" />

    <TextView
        android:id="@+id/copyTextView"
        style="@style/FileDialogOption"
        android:layout_width="0dp"
        android:layout_height="wrap_content"
        android:drawableLeft="@drawable/ic_content_copy_grey_24dp"
        android:drawableStart="@drawable/ic_content_copy_grey_24dp"
        android:text="Copy"
        app:layout_constraintLeft_toLeftOf="parent"
        app:layout_constraintRight_toRightOf="parent"
        app:layout_constraintTop_toBottomOf="@id/deleteTextView" />

</androidx.constraintlayout.widget.ConstraintLayout>

main Activity로 이동 후 OnLongClick 함수에 optionDialog 클래스를 연동합니다.

 companion object {
        private const val OPTIONS_DIALOG_TAG: String = "com.com.office.secuex.main.options_dialog"
    }
override fun onLongClick(fileModel: FileModel) {
        val optionsDialog = FileOptionsDialog.build {}

        optionsDialog.onDeleteClickListener = {
            FileUtilsDeleteFile(fileModel.path)
            updateContentOfCurrentFragment()
        }

        optionsDialog.show(supportFragmentManager, OPTIONS_DIALOG_TAG)
    }

마지막으로 파일 삭제 함수를 FileType.kt에 입력합니다.

fun deleteFile(path: String) {
    val file = File(path)
    if (file.isDirectory) {
        file.deleteRecursively()
    } else {
        file.delete()
    }
}

deleteFile 함수는 이름 변경을 사용해서 직접 import 합니다.

import com.office.secuex.common.deleteFile as FileUtilsDeleteFile

파일 탐색기에서 파일을 선택하고 길게 클릭하면 하단에 optionDilaog가 출력됩니다.

"Delete" 메뉴를 클릭하면 폴더 및 파일이 삭제됩니다.

파일 탐색기는 다양한 기능이 포함되어 있는 앱으로 처음 코틀린(Kotlin) 안드로이드를 공부하기 매우 좋은 앱입니다. 

파일 탐색기 기본 소스를 사용해서 다양하게 변형된 기능 앱을 지금 부터 개발해보세요.

감사합니다.


Build a File Explorer in Kotlin - Part 5 - Creating/Deleting files and folders - TheTechnoCafe

Till now you have only read files. In this part of Kotlin File Explorer Series you will learn how to create and delete file and folders.

thetechnocafe.com


반응형
반응형

오늘은 코틀린(Kotlin)을 사용해서 파일 탐색기 만들기에 경로 확인 ToolBar을 추가해보겠습니다.

파일 탐색기를 사용해서 파일을 이동하면 현재 위치를 알 수 없는 단점을 보안하기 위해서 상단에 ToolBar를 사용해서 현재 경로를 저장할 수 있는 로직을 구현해보겠습니다.

먼저 ToolBar에 적용하기 위한 layout을 생성합니다.

layout 하단에 item_file_breadcrumb.xml 파일을 생성합니다.

Android 버전에 따라서 ConstraintLayout는 패키지 정보를 수정해야 합니다.

수정을 안할 경우 실행 시 App이 바로 종료되는 문제가 발생합니다.

<?xml version="1.0" encoding="utf-8"?>
<androidx.constraintlayout.widget.ConstraintLayout xmlns:android="http://schemas.android.com/apk/res/android"
    xmlns:app="http://schemas.android.com/apk/res-auto"
    xmlns:tools="http://schemas.android.com/tools"
    android:layout_width="wrap_content"
    android:layout_height="wrap_content"
    android:background="?selectableItemBackgroundBorderless"
    android:padding="8dp">

    <ImageView
        android:id="@+id/arrowTextView"
        android:layout_width="20dp"
        android:layout_height="20dp"
        android:src="@drawable/ic_folder_dark_24dp"
        app:layout_constraintBottom_toBottomOf="parent"
        app:layout_constraintTop_toTopOf="parent"
        android:tint="@color/grey"/>

    <TextView
        android:id="@+id/nameTextView"
        android:layout_width="wrap_content"
        android:layout_height="wrap_content"
        android:layout_marginLeft="8dp"
        android:layout_marginStart="4dp"
        android:textSize="20sp"
        app:layout_constraintBottom_toBottomOf="parent"
        app:layout_constraintLeft_toRightOf="@id/arrowTextView"
        app:layout_constraintTop_toTopOf="parent"
        tools:text="Pictures" />

</androidx.constraintlayout.widget.ConstraintLayout>

ToolBar는 이미지를 출력하기 위한 ImageView 및 경로를 출력하기 위한 TextView로 구성해줍니다.

ImageView에 사용할 이미지를 Vector을 사용해서 추가합니다.

VectorDrawable는 정적 드로어블 객체로 path 및 group 객체로 구성할 수 있습니다.

https://developer.android.com/guide/topics/graphics/vector-drawable-resources?hl=ko 


벡터 드로어블 개요  |  Android 개발자  |  Android Developers

이 문서에서는 프레임워크 API 또는 지원 라이브러리를 통해 벡터 드로어블 리소스의 전반적인 사용을 설명합니다.

developer.android.com

drawable 하단에 ic_right_black_24dp.xml을 추가합니다.

<vector xmlns:android="http://schemas.android.com/apk/res/android"
    android:width="24dp"
    android:height="24dp"
    android:viewportWidth="24.0"
    android:viewportHeight="24.0">
    <path
        android:fillColor="#FF000000"
        android:pathData="M10,6L8.59,7.41 13.17,12l-4.58,4.59L10,18l6,-6z"/>
</vector>

vector을 사용해서 path를 구성합니다.

색상을 추가하기 위해서 colors.xml에 grey를 추가합니다.

이번에는 모든 경로를 확인하기 위한 RecyclerView.Adapter를 확장한 BreadcrumbFileAdapter 클래스를 생성합니다.

class BreadcrumbFileAdapter : RecyclerView.Adapter<BreadcrumbFileAdapter.ViewHolder>() {

    var onItemClickListener: ((FileModel) -> Unit)? = null

    var files = listOf<FileModel>()

    override fun onCreateViewHolder(parent: ViewGroup, viewType: Int): ViewHolder {
        val view = LayoutInflater.from(parent.context).inflate(R.layout.item_file_breadcrumb, parent, false)
        return ViewHolder(view)
    }

    override fun getItemCount() = files.size

    override fun onBindViewHolder(holder: ViewHolder, position: Int) = holder.bindView(position)

    fun updateData(files: List<FileModel>) {
        this.files = files
        notifyDataSetChanged()
    }

    inner class ViewHolder(itemView: View) : RecyclerView.ViewHolder(itemView), View.OnClickListener {

        init {
            itemView.setOnClickListener(this)
        }

        override fun onClick(v: View?) {
            onItemClickListener?.invoke(files[adapterPosition])
        }

        fun bindView(position: Int) {
            val file = files[position]
            itemView.nameTextView.text = file.name
        }
    }
}

사용자가 선택한 파일 목록을 업데이트 하기 위해서 클래스 내부에 있는 RecyclerView.Adapter를 사용합니다.

이제 경로를 확인하기 위한 layout을 activity_main.xml에 추가합니다.

<com.google.android.material.appbar.AppBarLayout
        android:layout_width="match_parent"
        android:layout_height="wrap_content">

        <androidx.appcompat.widget.Toolbar
            android:id="@+id/toolbar"
            android:layout_width="match_parent"
            android:layout_height="?attr/actionBarSize"
            app:title="@string/app_name"
            app:titleTextColor="@color/grey">

        </androidx.appcompat.widget.Toolbar>

        <androidx.recyclerview.widget.RecyclerView
            android:id="@+id/breadcrumbRecyclerView"
            android:layout_width="match_parent"
            android:layout_height="wrap_content">

        </androidx.recyclerview.widget.RecyclerView>

    </com.google.android.material.appbar.AppBarLayout>

Toolbar widget를 사용하기 위해서 AppBarLayout를 사용합니다.

최신 Android 버전에서는 패키지가 변경되어 패키지 수정이 필요합니다.

패키지 오류가 발생할 경우 아래 사이트를 확인해주세요.

https://believecom.tistory.com/750?category=1109462 


android How to solve ' java.lang.ClassNotFoundException: Didn't find class "com.google.android.material.appbar.AppBarLayout"'

Android에서 AppBarLayout을 추가하면 컴파일에는 문제가 없지만 실행 시점 오류가 발생합니다. 오류 내용은 'java.lang.ClassNotFoundException: Didn't find class "com.google.android.material.appbar.Ap..

believecom.tistory.com

정상적으로 소스를 추가 했다면 아래 화면을 확인할 수 있습니다.

상단에 텍스트가 추가된 ToolBar가 적용되어 있습니다.

파일 탐색기를 사용하면 다양하게 이동할 수 있기 때문에 모든 이벤트 내용을 저장해서 위치를 확인해야 합니다.

모든 내용을 저장하기 위해서 BackStackManager 클래스를 생성하겠습니다.

main 패키지 하단에 BackStackManager.kt를 추가해주세요.

class BackStackManager {
    private var files = mutableListOf<FileModel>()
    var onStackChangeListener: ((List<FileModel>) -> Unit)? = null

    val top: FileModel
        get() = files[files.size - 1]

    fun addToStack(fileModel: FileModel) {
        files.add(fileModel)
        onStackChangeListener?.invoke(files)
    }

    fun popFromStack() {
        if (files.isNotEmpty())
            files.removeAt(files.size - 1)
        onStackChangeListener?.invoke(files)
    }

    fun popFromStackTill(fileModel: FileModel) {
        files = files.subList(0, files.indexOf(fileModel) + 1)
        onStackChangeListener?.invoke(files)
    }
}

BackStackManager 클래스는 3개의 함수로 운영됩니다.

files 변수를 사용해서 파일 이동 경로를 저장합니다.

onStackChangeListener 이벤트를 사용해서 수진 정보를 확인합니다.

top 변수는 최상단 파일 정보를 리턴하게 적용합니다.

이제 BackStackManager을 적용하기 위해서 MainActivity로 이동합니다.

backStackManager 변수를 선언 합니다.

 private fun initViews() {
        setSupportActionBar(toolbar)

        breadcrumbRecyclerView.layoutManager = LinearLayoutManager(this, LinearLayoutManager.HORIZONTAL, false)
        mBreadcrumbFileAdapter = BreadcrumbFileAdapter()
        breadcrumbRecyclerView.adapter = mBreadcrumbFileAdapter
        mBreadcrumbFileAdapter.onItemClickListener = {
            supportFragmentManager.popBackStack(it.path, 2);
            backStackManager.popFromStackTill(it)
        }
    }
    private fun initBackStack(){
        backStackManager.onStackChangeListener = {
            updateAdapterData(it)
        }
        backStackManager.addToStack(fileModel = FileModel(Environment.getExternalStorageDirectory().absolutePath, FileType.FOLDER, "/", 0.0))
    }
    
    private fun updateAdapterData(files:List<FileModel>){
        mBreadcrumbFileAdapter.updateData(files)
        if(files.isNotEmpty()){
            breadcrumbRecyclerView.smoothScrollToPosition(files.size - 1)
        }
    }

toolbar 및 backStack를 초기화하기 위한 initViews(), InitBackStack() 함수를 생성합니다.

InitViews() 함수는 처음에 생성한 BreadcrumbFileAdapter을 사용해서 layout View에 연동합니다.

initBackStack() 함수는 BackStackManager가 동작할 경우 업데이트를 실행합니다.

이제 마지막으로 폴더를 선택할 경우 backStackManager를 연동해서 파일 정보를 업데이트합니다.

AddFileFragment(), onBackPressed() 함수에  backStackManager 클래스 메서드를 호출합니다.

이제 파일 탐색기에서 폴더를 이동하면 상단에 폴더 경로를 한눈에 확인할 수 있습니다.

폴더 경로 정보는 매우 단순한 내용처럼 보이지만 파일 이동에 따른 중요한 요소입니다.

오늘은 파일 탐색기 4번째 시간으로 파일 경로를 추가했습니다.

감사합니다.

http://thetechnocafe.com/build-a-file-explorer-in-kotlin-part-4-adding-breadcrumbs/


Build a File Explorer in Kotlin – Part 4 – Adding Breadcrumbs - TheTechnoCafe

In this File Explorer tutorial you will add the functionality which enables the user to navigate back to any position in the backstack.

thetechnocafe.com


반응형
반응형

Android에서 toolbar를 사용할 경우 추가 요소에 따른 오류가 발생합니다.

오류 내용

"java.lang.IllegalStateException: This Activity already has an action bar supplied by the window decor. Do not request Window.FEATURE_SUPPORT_ACTION_BAR and set windowActionBar to false in your theme to use a Toolbar instead"

 java.lang.RuntimeException: Unable to start activity ComponentInfo{com.office.secuex/com.office.secuex.SecuExplorer}: java.lang.IllegalStateException: This Activity already has an action bar supplied by the window decor. Do not request Window.FEATURE_SUPPORT_ACTION_BAR and set windowActionBar to false in your theme to use a Toolbar instead.
        at android.app.ActivityThread.performLaunchActivity(ActivityThread.java:3270)
        at android.app.ActivityThread.handleLaunchActivity(ActivityThread.java:3409)
        at android.app.servertransaction.LaunchActivityItem.execute(LaunchActivityItem.java:83)
        at android.app.servertransaction.TransactionExecutor.executeCallbacks(TransactionExecutor.java:135)
        at android.app.servertransaction.TransactionExecutor.execute(TransactionExecutor.java:95)
        at android.app.ActivityThread$H.handleMessage(ActivityThread.java:2016)
        at android.os.Handler.dispatchMessage(Handler.java:107)
        at android.os.Looper.loop(Looper.java:214)
        at android.app.ActivityThread.main(ActivityThread.java:7356)
        at java.lang.reflect.Method.invoke(Native Method)
        at com.android.internal.os.RuntimeInit$MethodAndArgsCaller.run(RuntimeInit.java:492)
        at com.android.internal.os.ZygoteInit.main(ZygoteInit.java:930)
     Caused by: java.lang.IllegalStateException: This Activity already has an action bar supplied by the window decor. Do not request Window.FEATURE_SUPPORT_ACTION_BAR and set windowActionBar to false in your theme to use a Toolbar instead.
        at androidx.appcompat.app.AppCompatDelegateImpl.setSupportActionBar(AppCompatDelegateImpl.java:345)
        at androidx.appcompat.app.AppCompatActivity.setSupportActionBar(AppCompatActivity.java:130)
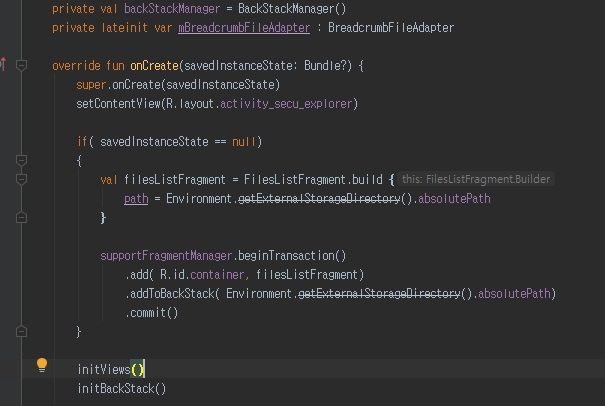
        at com.office.secuex.SecuExplorer.initViews(SecuExplorer.kt:67)
        at com.office.secuex.SecuExplorer.onCreate(SecuExplorer.kt:40)
        at android.app.Activity.performCreate(Activity.java:7802)
        at android.app.Activity.performCreate(Activity.java:7791)
        at android.app.Instrumentation.callActivityOnCreate(Instrumentation.java:1299)
        at android.app.ActivityThread.performLaunchActivity(ActivityThread.java:3245)
        at android.app.ActivityThread.handleLaunchActivity(ActivityThread.java:3409) 
        at android.app.servertransaction.LaunchActivityItem.execute(LaunchActivityItem.java:83) 
        at android.app.servertransaction.TransactionExecutor.executeCallbacks(TransactionExecutor.java:135) 
        at android.app.servertransaction.TransactionExecutor.execute(TransactionExecutor.java:95) 
        at android.app.ActivityThread$H.handleMessage(ActivityThread.java:2016) 
        at android.os.Handler.dispatchMessage(Handler.java:107) 
        at android.os.Looper.loop(Looper.java:214) 
        at android.app.ActivityThread.main(ActivityThread.java:7356) 
        at java.lang.reflect.Method.invoke(Native Method) 
        at com.android.internal.os.RuntimeInit$MethodAndArgsCaller.run(RuntimeInit.java:492) 
        at com.android.internal.os.ZygoteInit.main(ZygoteInit.java:930)

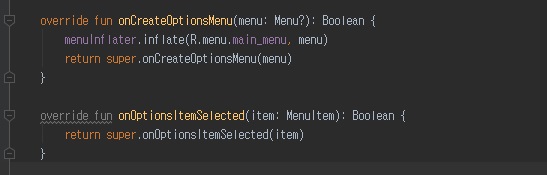
상기 오류는 toolbar가 먼저 구성되어 있는 상태에서 추가를 할 경우 발생하는 오류 입니다.

setSupportActionBar(toolbar)

함수를 사용할 경우 많이 발생합니다.

오류 해결 방법

오류를 해결하기 위해서는 res/values/styles.xml 파일에

<item name="windowActionBar">false</item>
<item name="windowNoTitle">true</item>

상기 내용을 추가하면 오류 없이 컴파일 할 수 있습니다.

감사합니다.

반응형
반응형

Android에서 AppBarLayout을 추가하면 컴파일에는 문제가 없지만 실행 시점 오류가 발생합니다.

오류 내용은 'java.lang.ClassNotFoundException: Didn't find class "com.google.android.material.appbar.AppBarLayout"' 입니다.

at android.app.Activity.performCreate(Activity.java:7802)
        at android.app.Activity.performCreate(Activity.java:7791)
        at android.app.Instrumentation.callActivityOnCreate(Instrumentation.java:1299)
        at android.app.ActivityThread.performLaunchActivity(ActivityThread.java:3245)
        at android.app.ActivityThread.handleLaunchActivity(ActivityThread.java:3409)
        at android.app.servertransaction.LaunchActivityItem.execute(LaunchActivityItem.java:83)
        at android.app.servertransaction.TransactionExecutor.executeCallbacks(TransactionExecutor.java:135)
        at android.app.servertransaction.TransactionExecutor.execute(TransactionExecutor.java:95)
        at android.app.ActivityThread$H.handleMessage(ActivityThread.java:2016)
        at android.os.Handler.dispatchMessage(Handler.java:107)
        at android.os.Looper.loop(Looper.java:214)
        at android.app.ActivityThread.main(ActivityThread.java:7356)
        at java.lang.reflect.Method.invoke(Native Method)
        at com.android.internal.os.RuntimeInit$MethodAndArgsCaller.run(RuntimeInit.java:492)
        at com.android.internal.os.ZygoteInit.main(ZygoteInit.java:930)
E/AndroidRuntime: Caused by: java.lang.ClassNotFoundException: Didn't find class "com.google.android.material.appbar.AppBarLayout" on path: DexPathList

실행 시점에 발생하는 오류이기 때문에 패키지 모듈이 없어서 발생하는 문제로 확인됩니다.

build.gradle에 AppBarLayout에 필요한 패키지를 선언하면 해결됩니다.


Android ClassNotFoundException 해결 방법
implementation 'com.google.android.material:material:1.0.0'

혹 버전이 다를 경우 메인 클래스에서 오류가 발생할 수 있습니다.

버전 확인 후 패키지를 등록하면 정상적으로 AppBarLayout을 사용할 수 있습니다.

감사합니다.

반응형
반응형

오늘은 코틀린(Kotlin)에서 XML을 사용하는 방법에 대해서 알아보겠습니다.

XML은 다양한 포맷을 지원하기 때문에 JSON 비해 느린 단점이 있지만 

일반적으로 사용하기 매우 편리한 저장 포맷입니다.

android에서는 외부 파일을 확인하기 위해서 일반적인 접근이 불가능합니다.

그래서 미리 만들어둔 XML 파일을 APK에 포함시켜 사용할 수 있는 방법을 적용해야 XML을 쉽게 접근할 수 있습니다.

android에서는 APK에 XML 파일을 포함할 수 있는 에셋(asset) 폴더를 생성해서 접근이 가능합니다.

안드로이드(android) 프로젝트를 생성하면 assets 폴더는 포함되어 있지 않습니다.

폴더 추가를 사용해서 assets 폴더를 생성하고 info.xml을 생성합니다.

<?xml version="1.0" encoding="utf-8"?>
<book>
   <bookinfo id="1111" name="책1번"  des="책1번은 요리책입니다." />
   <bookinfo id="1112" name="책2번"  des="책2번은 요리책입니다." />
   <bookinfo id="1113" name="책3번"  des="책3번은 요리책입니다." />
   <bookinfo id="1114" name="책4번"  des="책4번은 요리책입니다." />
</book>

간단하게 XML을 로드하기 위해서 4개의 로드를 생성합니다.

정상적으로 XML이 만들어지면 브라우저에서 트리 구조 파일을 확인할 수 있습니다.

코틀린(kotlin)에서 XML을 사용하기 위해서는 org.xmlpull.v1.XmlPullParser,

org.xmlpull.v1.XmlPullParserFactory 패키지를 포함해야 합니다.

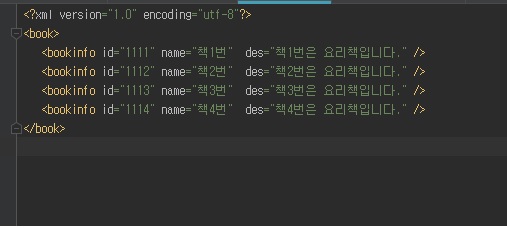
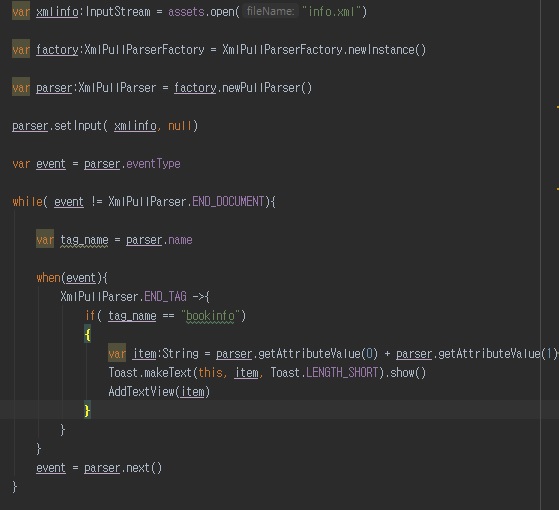
먼저 InputStream을 사용해서 생성한 폴더 assets에 접근해서 XML 파일을 open 합니다.

XmlPullParserFactory를 사용해서 신규 인터페이스를 생성합니다.

XmlPullParser를 생성해서 factory와 연결 후 xml파일을 로드합니다.

var xmlinfo:InputStream = assets.open("info.xml")

var factory:XmlPullParserFactory = XmlPullParserFactory.newInstance()

var parser:XmlPullParser = factory.newPullParser()

parser.setInput( xmlinfo, null)

전체 XML 파일을 확인하기 위해서 타입을 확인하고 END_DOCUMENT까지 로드를 반복합니다.

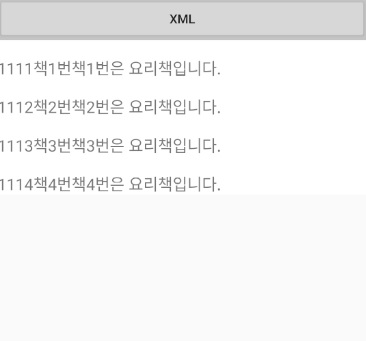
설정한 tag는 "bookinfo"이므로 if 문에서 "bookinfo"일 경우만 getAttributeValue를 사용해서 하위 로드에 접근합니다.

getAttributeValue는 배열 형태로 Value 정보를 확인할 수 있습니다.

while( event != XmlPullParser.END_DOCUMENT){

                var tag_name = parser.name

                when(event){
                    XmlPullParser.END_TAG ->{
                        if( tag_name == "bookinfo")
                        {
                            var item:String = parser.getAttributeValue(0) + parser.getAttributeValue(1) + parser.getAttributeValue(2)
                            Toast.makeText(this, item, Toast.LENGTH_SHORT).show()
                            AddTextView(item)
                        }
                    }
                }
                event = parser.next()
            }

parser.next()를 사용해서 다음 로드로 이동하면 됩니다.

코틀린(kotlin)을 사용하면 XML을 쉽게 관리할 수 있어 매우 편리합니다.

다양한 외부 정보를 관리하기 위해서는 XML은 꼭 필요한 포맷이기 때문에 공부하시면 좋습니다.

컴파일하면 XML 로드와 동일하게 리스트를 생성합니다.

XML과 JSON을 많이 비교합니다.

JSON은 상대적으로 XML보다 빠르기 때문에 서버 데이터 전송에 많이 사용됩니다.

XML 장점은 UTF-8만 지원하는 JSON과 다르게 다양한 인코딩 형식을 지원하기 때문에 범용적으로 사용하기 좋습니다.

읽기/쓰기 속도에 큰 문제가 없는 프로그램이라면 XML 사용을 적극 추천드립니다.

감사합니다.


반응형
반응형

파일 탐색기를 사용하면 파일과 폴더 타입에 따라서 폴더 이동이 가능해야 합니다.

오늘은 코틀린(Kotlin)을 이용한 탐색기 세 번째 파트 파일 탐색기 이벤트 연동에 대해서 알아보겠습니다.

파일 탐색기 이벤트 연동은 파일, 폴더를 구분해서 재 탐색을 해야 합니다.

먼저 FilesListFragment에서 OnItemClickListener 이벤트 변수를 선언합니다.

아래쪽에 interface를 사용해서 onClick, onLogClick 함수를 선언합니다.

private lateinit var eCallback: OnItemClickListener

    interface OnItemClickListener{
        fun onClick(fileModel : FileModel)

        fun onLongClick(fileModel : FileModel)
    }

override onAttach를 선언하고 OnItemClickListener로 캐스팅하여 eCallback에 연결합니다.

onAttach는 실행 시점에 호출되기 때문에 오류를 방지하기 위해서 catch를 사용해서 오류를 정의합니다.

 override fun onAttach(context: Context?) {
        super.onAttach(context)

        try{
            eCallback = context as OnItemClickListener
        } catch( e: Exception){
            throw Exception("${context} FileListFragment onAttach")
        }
    }

FilesListFragment 클래스를 MainActivity에 상속합니다.

클래스명을 선언하면 OnItemClickListener 이벤트를 확인할 수 있습니다.

FilesListFragment 클래스는 interface로 onClick, onLongClick를 선언했기 때문에 상속을 받게 되면 interface를 선언해야 오류가 발생하지 않습니다.

onClick, onLongClick를 override하여 선언합니다.

onClick이벤트가 발생하면 container에 View를 실행하고 파일 정보를 넘겨줄 수 있는 AddFileFragment를 선언합니다.

	override fun onClick(fileModel: FileModel) {
       
    }

    override fun onLongClick(fileModel: FileModel) {
       
    }

    private fun AddFileFragment(fileModel: FileModel){
        val filesListFragment = FilesListFragment.build {
            path = fileModel.path
        }

        val fragmentTransaction = supportFragmentManager.beginTransaction()
        fragmentTransaction.replace(R.id.container, filesListFragment)
        fragmentTransaction.addToBackStack(fileModel.path)
        fragmentTransaction.commit()
    }

onClick 이벤트에 폴더일 경우 파일 경로를 저장하기 위해서 AddFileFragment를 연결합니다.

스택에 더 이상 확인할 내용이 없을 경우 종료할 수 있게 onBackPressed를 override 해줍니다.

override fun onBackPressed(){
        super.onBackPressed()
        if( supportFragmentManager.backStackEntryCount ==0){
            finish()
        }
    }

파일을 선택하면 파일 확장자에 연결된 앱을 실행하기 위해서 이벤트를 연동해야 합니다.

FileUtils.kt파일에 앱을 실행할 수 있는 함수 launchFileIntent를 선언합니다.

fun Context.launchFileIntent(fileModel: FileModel) {
    val intent = Intent(Intent.ACTION_VIEW)
    intent.data = FileProvider.getUriForFile(this, packageName, File(fileModel.path))
    intent.flags = Intent.FLAG_GRANT_READ_URI_PERMISSION
    startActivity(Intent.createChooser(intent, "Select Application"))
}

launchFileintent 함수는 fileModel 경로에 확인된 확장자에 따라서 설치된 앱을 실행합니다.

폴더가 아닐 경우 launchFileIntent 함수를 사용해서 앱 실행을 적용합니다.

override fun onClick(fileModel: FileModel) {
        if( fileModel.fileType == FileType.FOLDER){
            AddFileFragment(fileModel)
        }else{
            launchFileIntent(fileModel)
        }
    }

onClick 함수는 폴더일 경우 AddFileFragment를 재 호출하여 리스트를 생성합니다.

파일 경우 launchFileIntent 함수를 사용해서 앱을 실행하고 뒤로 가기를 클릭하면 다시 폴더 리스트를 호출합니다.

마지막으로 InitViews함수에서 초기화 시점에 mFilesAdapter에 클릭 이벤트를 연동합니다.

mFilesAdapter.onItemClickListener = {
            eCallback.onClick(it)
        }

        mFilesAdapter.onItemLongClickListener = {
            eCallback.onLongClick(it)
        }

onItemClickListener, onItemLongClickListener 함수에 eCallback 이벤트를 연동하면 리스트 클릭 시점에 eCallback가 호출되면서 이벤트가 연동됩니다.

컴파일해서 실행하면 리스트에서 하위 폴더가 있을 경우 리스트가 변경되는 것을 확인할 수 있습니다.

폴더 하단에 아무것도 없을 경우는 "there is nothing here" View를 확인할 수 있습니다.

파일을 클릭하면 연결된 앱 실행 여부를 확인하고 앱을 실행할 수 있습니다.

탐색기를 사용한 이벤트 연동은 어렵게 보이지만, 기본은 간단한 이벤트 연동이기 때문에 조금만 보면 바로 확인할 수 있습니다.

다음 시간에는 파일 경로를 확인할 수 있는 로직을 추가해보겠습니다.

감사합니다.


http://thetechnocafe.com/build-a-file-explorer-in-kotlin-part-3-navigating-through-file-system/


Build a File Explorer in Kotlin – Part 3 – Navigating through File System - TheTechnoCafe

Welcome to the 3rd part of the Kotlin File Explorer series. Good job reading files from a path in the previous tutorial. Right now our application takes...

thetechnocafe.com


반응형

+ Recent posts